What is Cloudinary?
Cloudinary is a cloud-based image and video management platform that provides an alternative solution for storing, managing, optimising, and delivering media assets (images and videos) for websites and mobile applications.
Cloudinary offers a wide range of features and functionalities that are designed to simplify the process of handling media assets, improving performance, and enhancing user experience. Before we delve straight into coding it with React, let’s first understand why we might want to use cloud services like Cloudinary.
But Why Cloudinary?
Yes, I know what you are thinking: “why do I have to store my files on an external server?”
Well, unless you have the resources and wherewithal, there are two important reasons why developers prefer cloud storage for their assets:
- Speed.
- Space.
Speed: Cloudinary integrates with leading CDN providers to ensure fast and reliable delivery of media assets to users worldwide. CDN caching helps reduce latency and improve performance by serving content from edge locations closer to the user’s location.
Space: Cloudinary allows users to upload images and videos to its cloud-based storage infrastructure, eliminating the need for local storage and enabling easy access to media assets from anywhere.
Steps to Uploading Images to Cloudinary in React
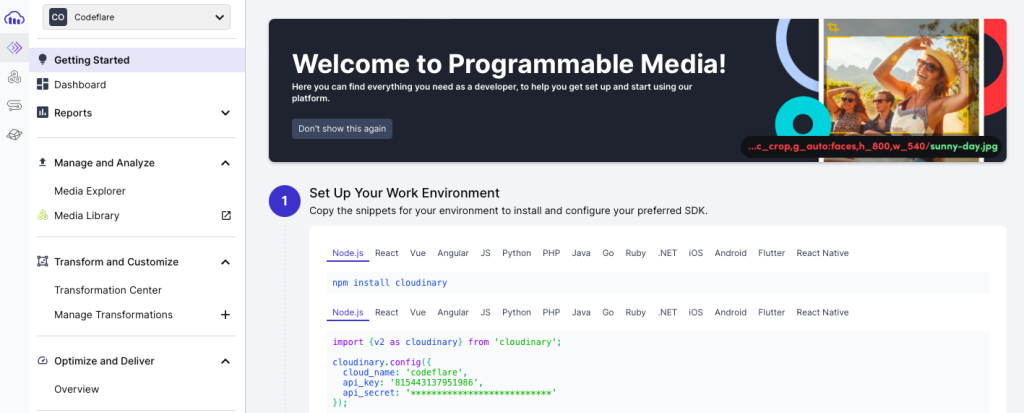
- Create an account on Cloudinary: The first step to uploading image to Cloudinary is to have an account. Go to cloudinary.com to create an account. This is what your Cloudinary dashboard should look like:

Next, after creating your account, there are 2 (two) things you need to look out for, which are your cloud name and preset name.
To see your cloud name, click on the gear icon in the left-hand menu -> Account. There you should see your Product environment cloud name.
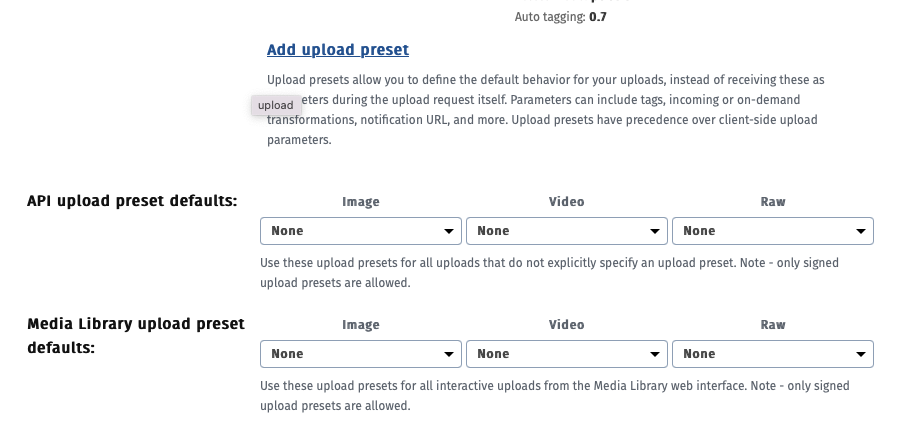
According to the Cloudinary website, upload presets enable you to centrally define a set of asset upload options instead of specifying them in each upload call. You can define multiple upload presets and apply different presets in different upload scenarios.
You can set your presets as signed or unsigned. Unsigned presets can be used with unsigned upload calls, such as uploading directly from the browser, in the upload widget or for Auto Upload settings. If you don’t already have a preset, you will be required to create one.

React Code
Since we’ve begin making all these explanations and building on our foundation on Cloudinary. But it’s time for us to put our code where our mouth is! We’re going to upload an image to Cloudinary in React.
First I’ll assume you know how to setup a React, if not check out React lessons here.
So here’s a basic form in React:
import React from 'react';
import { Button, Spinner } from 'react-bootstrap';
import Swal from "sweetalert2";

const App = () => {

return (
 <div className="container">
   <form className="mt-4">
   <input type="file" accept="image/png, image/jpeg" /><br/><br />
   <Button disabled={disabled} className="btn btn-primary" variant="primary">
   Upload Image
   </Button>
   </form>
 </div>
);
 }


export default App;
This is what it looks like here:

So far this is just basic. We need to handle the file upload. We will modify our code as follows:
import React, {useState} from 'react';
import { Button, Spinner } from 'react-bootstrap';
import Swal from "sweetalert2";

const App = () => {
 const [uploading, setUploading] = useState(false);
 const [disabled, setDisabled] = useState(false);
 const [file, setFile] = useState("");
 const [fileName, setFileName] = useState("");

 const handleChange = (e) => {
   setFileName(e.target.files[0])
   setFile(URL.createObjectURL(e.target.files[0]));
 }

return (
 <div className="container">
   <form className="mt-4">
   <input type="file" accept="image/png, image/jpeg" onChange={handleChange} /><br/><br />
<Button disabled={disabled} className="btn btn-primary" onClick={()=>uploadprofileImageToCloudinary()}>
   {uploading ? (
         <Spinner animation="border" variant="light" size="sm" />
       ) : (
         "Update"
       )}
   </Button>
   </form>
 </div>
);
 }


export default App;
Before we proceed, just a bit of explanation here:
We have a function called handleChange(), which handles the file upload. We have a spinner that rolls when the update is in progress. Next, we will write a script that uploads the file to Cloudinary.
But first, you have to specify your cloud-and- preset name. We’ll do that as follows:
const CLOUD_NAME = "your_cloud_name"
const PRESET_NAME = "your_preset_name"
const uploadprofileImageToCloudinary = () => {
if(fileName === ""){
Swal.fire({
title: "Empty",
text: "Please select an image",
icon: "error",
confirmButtonText: "OK",
backdrop:
rgba(143, 70, 0, 0.3)
url("")
left top
no-repeat
})
}else{
setUploading(true)
setDisabled(true);
let formdata = new FormData();
formdata.append("file", fileName);
formdata.append("cloud_name", CLOUD_NAME);
formdata.append("upload_preset", PRESET_NAME);
//upload image to cloudinary
fetch(`https://api.cloudinary.com/v1_1/${CLOUD_NAME}/upload`, { method: 'POST',
body: formdata
}).then(response => response.json())
.then(responseJson => {
console.log(responseJson.secure_url)
}).catch(error => {
console.log(error)
})
}
}Here’s the full working code:
import React, {useState} from 'react';
import { Button, Spinner } from 'react-bootstrap';
import Swal from "sweetalert2";

const App = () => {
 const [uploading, setUploading] = useState(false);
 const [disabled, setDisabled] = useState(false);
 const [file, setFile] = useState("");
 const [fileName, setFileName] = useState("");
 const CLOUD_NAME = "your_cloud_name"
 const PRESET_NAME = "your_preset_name"

 const handleChange = (e) => {
   setFileName(e.target.files[0])
   setFile(URL.createObjectURL(e.target.files[0]));
 }

 const uploadprofileImageToCloudinary = () => {
     if(fileName === ""){
       Swal.fire({
         title: "Empty",
         text: "Please select an image",
         icon: "error",
         confirmButtonText: "OK",
       })
     }else{
     setUploading(true)
     setDisabled(true);
     let formdata = new FormData();
     formdata.append("file", fileName);
     formdata.append("cloud_name", CLOUD_NAME);
     formdata.append("upload_preset", PRESET_NAME);
     //upload image to cloudinary
     fetch("https://api.cloudinary.com/v1_1/dqy22jr2i/upload", {
         method: 'POST',
         body: formdata
       }).then(response => response.json())
         .then(responseJson => {
           console.log(responseJson.secure_url)
         }).catch(error => {
            console.log(error)
         })
    }
    }

return (
 <div className="container">
   <form className="mt-4">
   <input type="file" accept="image/png, image/jpeg" onChange={handleChange} /><br/><br />
<Button disabled={disabled} className="btn btn-primary" onClick={()=>uploadprofileImageToCloudinary()}>
   {uploading ? (
         <Spinner animation="border" variant="light" size="sm" />
       ) : (
         "Update"
       )}
   </Button>
   </form>
 </div>
);
 }


 export default App;
This is what we are sending to Cloudinary along with our cloud name: https://api.cloudinary.com/v1_1/${CLOUD_NAME}/upload
responseJson.secure_url is image url hosted in Cloudinary that is being returned

Summary
Overall, Cloudinary simplifies the process of managing media assets for web and mobile applications, enabling developers and content creators to focus on delivering engaging and visually appealing experiences to their users.
Let me know what you think in the comments!
